Making the thesaurus work in Microsoft Office 2010
The Problem
Office 2010 stubbornly insists that the language setting for the thesaurus and the spellchecker follows the currently active input language for Windows 7. This can be a little bothersome, especially when editing documents in a foreign language with a keyboard layout other than the one commonly used to edit that language. To reproduce the problem on your own computer try this:
- Start Microsoft Word
- Select a language different from your active Windows 7 input language as 'Proofing Language' ('Review => Language => 'Set Proofing Language')
- Enter some text in the aforementioned language
- Position the input cursor in one of the words
- Use the 'Thesaurus' tool from the 'Review' ribbon
- Observe that the thesaurus works fine on this first lookup, and that it reverts back to your selected input language in Windows 7 when you try to follow the links back and forth in the thesaurus.
The Solution
To solve the problem we have to do some configuration of 'Input Languages' in Windows 7. We have to install support for the languages you want to use in Microsoft Office 2010 as input languages in Windows 7, and add your keyboard layout of choice to that input language setting. Then you will be able to control the language setting in Microsoft Office using the language bar in Windows 7. This is, as far as I know, the only way to make things work as intended.
A working thesaurus is well worth the trouble. This is a relatively straight-forward thing to accomplish, although it involves several steps to complete.
This article will use British English with Norwegian keyboard layout as an example setup. This setup will be useful for employees and students at the University of Bergen taking courses in English, as well as several others. The process will be similar for other languages, such as German, French, Chinese, Japanese and Arabic. Note that you have to add your physical keyboard layout to each and all of the input languages you use. Thus, if you use multiple languages in your textual work, say English, German and Norwegian, you have to enable Norwegian keyboard layout for each of these languages.
Add British English to the List of 'Input Languages' in Windows 7
Following the example setup, the first step is to add British English to the list of 'Input Languages' in Windows 7. This is accomplished as follows:
- Open the Start-menu
- Type the text 'lang' in the search box
- Choose the item 'Change keyboards or other input methods' in the 'Control Panel' group
- If you have a different interface language active for Windows 7 you will have to use a different search string to find the 'Control Panel' item. In Norwegian the item is called 'Endre tastatur- eller anndre inndatametoder', thus you can search for it using the text 'tastatur'
- Use the button 'Change keyboards...'
- Use the button 'Add...' in the tab-group 'Installed Services' ta add a new keyboard layout
- Hit the 'E' key on the keyboard to jump to the list of English input methods
- Expand the group 'English (United Kingdom)'
- Expand the subgroup 'Keyboard'
- The dialogue should now look like the image below
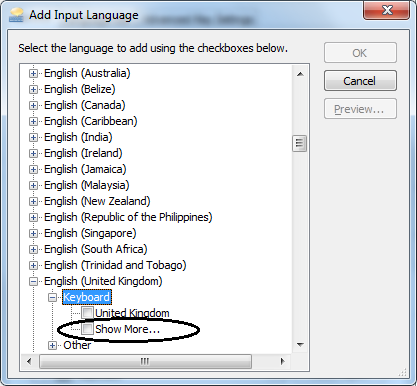
- Now for the trick that makes the day
- Select the item 'Show more...' in the subgroup 'Keyboard'
- Scroll upward in the list, and select 'Norwegian'
- Use the 'OK' button to confirm
- Make sure 'Norwegian' is listed above any other entries in the subgroup 'Keyboard' under 'English (United Kingdom)'
- If this is not the case, you will have to select 'Norwegian' in that subgroup, and use the button 'Move Up' until it is listed at the top in the subgroup
- IF you want British English to be the default input language, then choose 'English (United Kingdom) - Norwegian' from the drop-down box in the tab group 'Default input language'
- This sets the default input language and uses the correct keyboard language (Norwegian)
- The dialogue should look like the image below
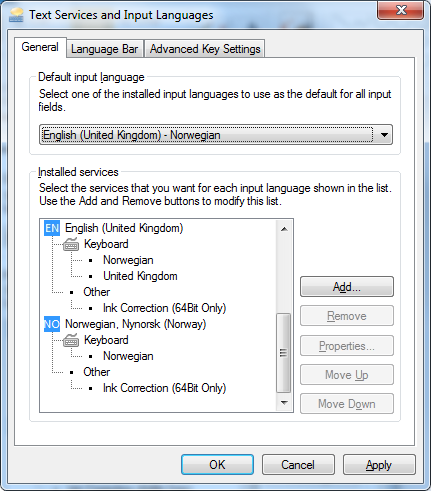
- Use the 'OK' button to save the settings


These settings will be enabled for subsequently started programs and saved in your Windows profile for later login sessions. For any running programs you will have to select the desired input method with the language bar.
Selecting British English for standard input language might be a bit drastic. Remember that this will effectively change the default proofing language for all Microsoft Office programs, such as Microsoft Outlook and Microsoft Powerpoint. Other programs might be affected as well. If you want to select input languages for each program separately, this has to be done each time you start the program, by means of the language bar. Se below for instructions for doing so.
Adding British English as Proofing Language for Microsoft Office
To add British English to the list of enabled proofing languages in Microsoft Office do the following:
- Open the Start-menu
- Enter the text 'lang' in the search box
- Choose the item 'Microsoft Office 2010 Language Preferences' from the group 'Programs'
- Use the list-box '[Add additional editing languages]' in the bottom part of the tab group 'Choose Editing Languages'
- Select 'Englsih (U.K.)' from the list
- Use the button 'Add' to add the selected proofing language
- Use the button 'Set as Default' to set British English as default proofing language
- Use the button 'Yes' in the warning message box to confirm your choice
The dialogue should look like the image below:

Disable Automatic Detection of Proofing Language in Microsoft Word
Microsoft Word 2010 is normally configured to try and guess which proofing language to use, based on heuristics on the text in the paragraph or sentence. This works notoriously bad. I prefer to turn this "feature" off. I find it much more reliable to select proofing languages using the language bar. Se below for instructions for doing so.
To disable the guesswork involved in autodetecting the proofing language do the following:
- Open Microsoft Word
- Select 'Language => Set Proofing Language...' from the ribbon 'Review'
- Uncheck 'Detect language automatically'
- Use the button 'Set as Default'
- Confirm by using the button 'Yes'
- Use the button 'OK' to save the changes
Microsoft Word will now select which proofing language to use based on your choice of input language. Se below for instructions on how to do this. You may also manually specify proofing language for a portion of the text in Microsoft Word.
Using the Language Bar to Select Input Language
The language bar is normally visible in the system tray. It appears as a small button with a two-letter language code.
![]()
Using this button you can switch between the different input languages that are active on your Windows 7 computer. Note that there is now a separate keyboard icon next to the language code for the languages with more than one active keyboard layout. This can be used to switch keyboard layouts without changing the input language.

This, by the way, is the way to select keyboard layout while using complex languages, such as Chinese, Japanese, and Arabic. Such languages have different keyboard languages for different purposes. Such languages might also need extra language packages, as available from Windows Update, installed in order to work properly. At the University of Bergen you will need help from the IT Department for Installing extra language packages.
Using the language bar you can select the input method and keyboard layout on a per-program basis. Microsoft Office will select proofing language accordingly if you have followed the instructions above.
You can optionally set up hot keys for switching input languages. This is can be achieved using 'Settings => Advanced Keys Settings' on the language bar.

The Result
Now you have a working thesaurus and spell checker in Microsoft Office. As far as I know, the method outlined in this article is the only way to make the spell checker and thesaurus work properly in Microsoft Office.
To verify that the thesaurus in Microsoft Word works as intended:
- Open a document with foreign text, say British English, in it in Microsoft Word
- Place the text cursor on the word you want to look up
- Select English input language
- Use 'Thesaurus' from the ribbon 'Review'
- The thesaurus will open in a column to the right
You will now be able to navigate back and forth in the tree of linked words in the thesaurus.
To verify that the spell checker works as intended:
- Open Microsoft Word
- Select the desired input language, say British English
- Write some text
The text should be proofread properly.
